

👇DOWNLOAD HERE👇

This is the perfect starter project for working with your design mat and 3D pen. I know you're anxious to create something three-dimensional with your new 3D drawing pen, but for starters, let’s get to know your mat and how it feels to trace its grooves. If you're new to 3D pen art, it's easier to start with a two-dimensional project to get used to your new pen before you use it to fight gravity. This project is also an introduction to some simple ways to use heat to modify your creations after you've made them.
Have fun!
You will need:

- 3D pen
- 3Dmate Design Mat
- 4 colors of PLA (This project was not tested with other kinds of plastic.)
- Filament cutter (big scissors or pliers that produce a straight cut)
- Small scissors (or your favorite tool to cut stray plastic threads - wood burning tools with variable temperature control work well for this job)
- Baking surface (ceramic tile or cookie sheet)
- Baking liner (silicone mat or parchment paper)
- Oven mitts
- Toaster oven or household oven
Let's get started:
1.

The 3D mat has six segments featuring grids for various geometric shapes. This project uses the right lower corner template. Start by tracing the outer edges.
2.

Continue tracing the horizontal lines, making sure each line adheres to the outer edges. The nozzle of most 3D pens will fit very snugly into the grooves of the mat and guide your hand to produce very straight lines not easily achievable by even an experienced free hand user. Fill in all available horizontal lines.
3.

Continue to fill in the cross lines of the grid. When you cross the existing lines, make sure the pen's nozzle stays safely within the grooves. When you finish tracing, pop the grid out of the mat. It will come out very easily. Make a second grid the same way.
4.
Print this PDF Template (Click Here to Download the PDF file) and use it as guide when aligning two square components.
Lay the two grids on top of each other. As they move they will create changing patterns. Align the two grids according to the diagram. It will produce larger squares in the middle, smaller ones in the corners and two sets of small rectangular shapes.
5.

Holding onto both grids, join them in the corners with a few beads from the 3D pen.
6.

Bake on a cookie sheet (or a ceramic tile) lined with silicone liner in a toaster oven (or a regular household oven) at 400°F (200° C) for about 7 minutes or until the two grids fuse together. You may need to slightly lower the temperature or increase the time depending on your oven and baking surface. The silicone baking liner can be replaced with parchment paper (not to be confused with wax paper), but silicone is preferable as the parchment tends to curl up and/or wrinkle, which can distort delicate designs. Baking will not only fuse the grids but also make your lines more even, soften the sharp corners, and get rid of most of the annoying hair-like threads that form when you use the 3D pen.
Before

After

7.

Place the baked grid on the back flat side of your mat. Fill in the larger squares with tan or a color of your choice. To minimize the unwanted stray strands of plastic trailing from your pen after stopping it, wait until the pen retracts completely before you lift it at the end of each segment. This will not eliminate the “hair" completely, but it helps considerably.
8.
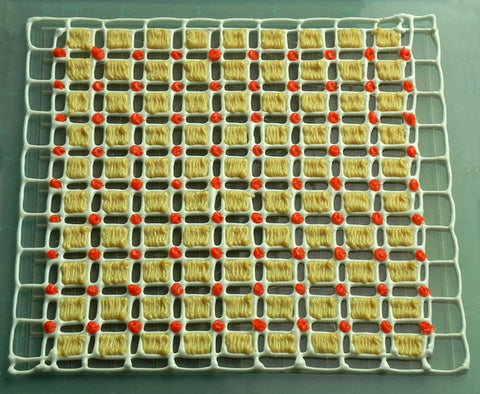
Fill in the small squares with red.
9.

Fill the rectangles with your last color. Trim any stray “hair” with small scissors or by melting it with a wood-burning tool. Finally, place your finished coaster face down on your baking surface (the flat bottom will become the top of the coaster) and re-bake (same time and temperature) until the whole surface fuses and becomes flat. Cool completely before handling to prevent warping. If your design develops pinholes, fill them with small amounts of the same color and re-bake.
Done!!!
